Learning photography with a film camera is exciting, but it can feel tricky at first. Film cameras don’t have fancy screens or automatic corrections like digital cameras. That’s why understanding the basic controls is key. Here’s a simple cheat sheet to help beginners take better photos with a film camera.
1) Shutter Speed
Shutter speed controls how long the camera’s shutter stays open to let light hit the film.
-
Fast shutter speed (like 1/500s) → freezes motion, good for sports or moving objects.
-
Slow shutter speed (like 1/30s) → shows motion blur, great for waterfalls, light trails, or night shots.
Tip: Use a tripod for slow shutter speeds to avoid blurry photos from hand shake.
2) Aperture (f-stop)
Aperture is the size of the hole in the lens that lets light in. It also affects depth of field (how much of the photo is in focus).
-
Wide aperture (f/1.8, f/2.8) → more light, blurry background, great for portraits.
-
Small aperture (f/8, f/16) → less light, more of the scene in focus, good for landscapes.
Tip: Lower f-number = brighter photo + shallow focus, higher f-number = darker photo + more detail.
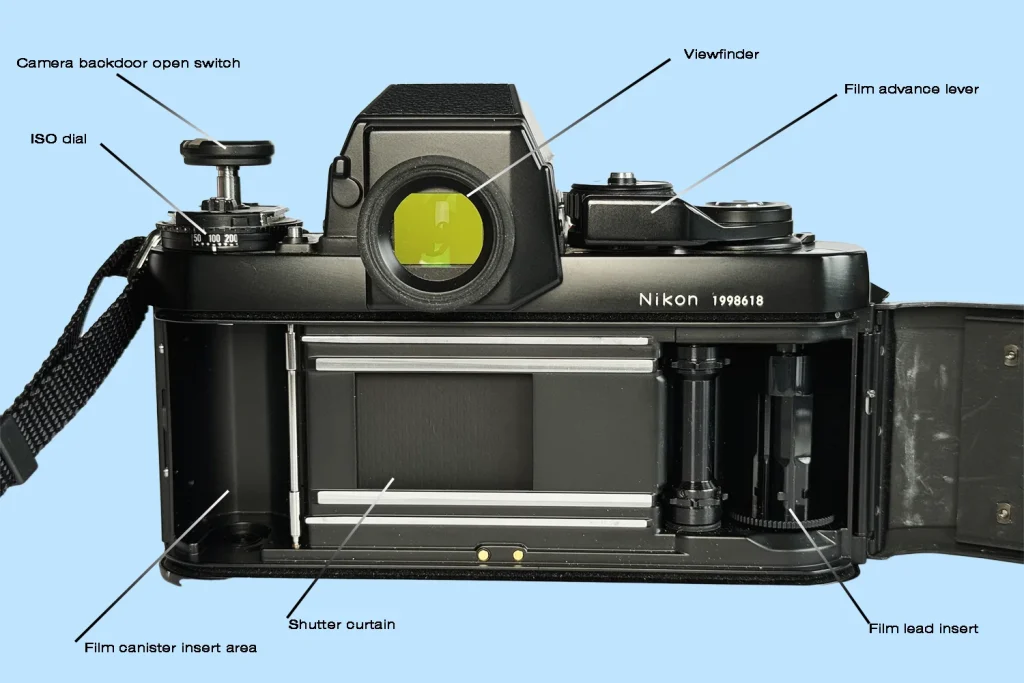
3) ISO / Film Speed
ISO refers to the sensitivity of the film to light. On film cameras, this is set by the type of film you load.
-
Low ISO (100–200) → best for sunny days, sharp images.
-
Medium ISO (400–800) → good for cloudy days or indoor shots.
-
High ISO (1600+) → works in low light but grainier images.
Tip: Choose film speed based on lighting conditions and how smooth or grainy you want your photo.
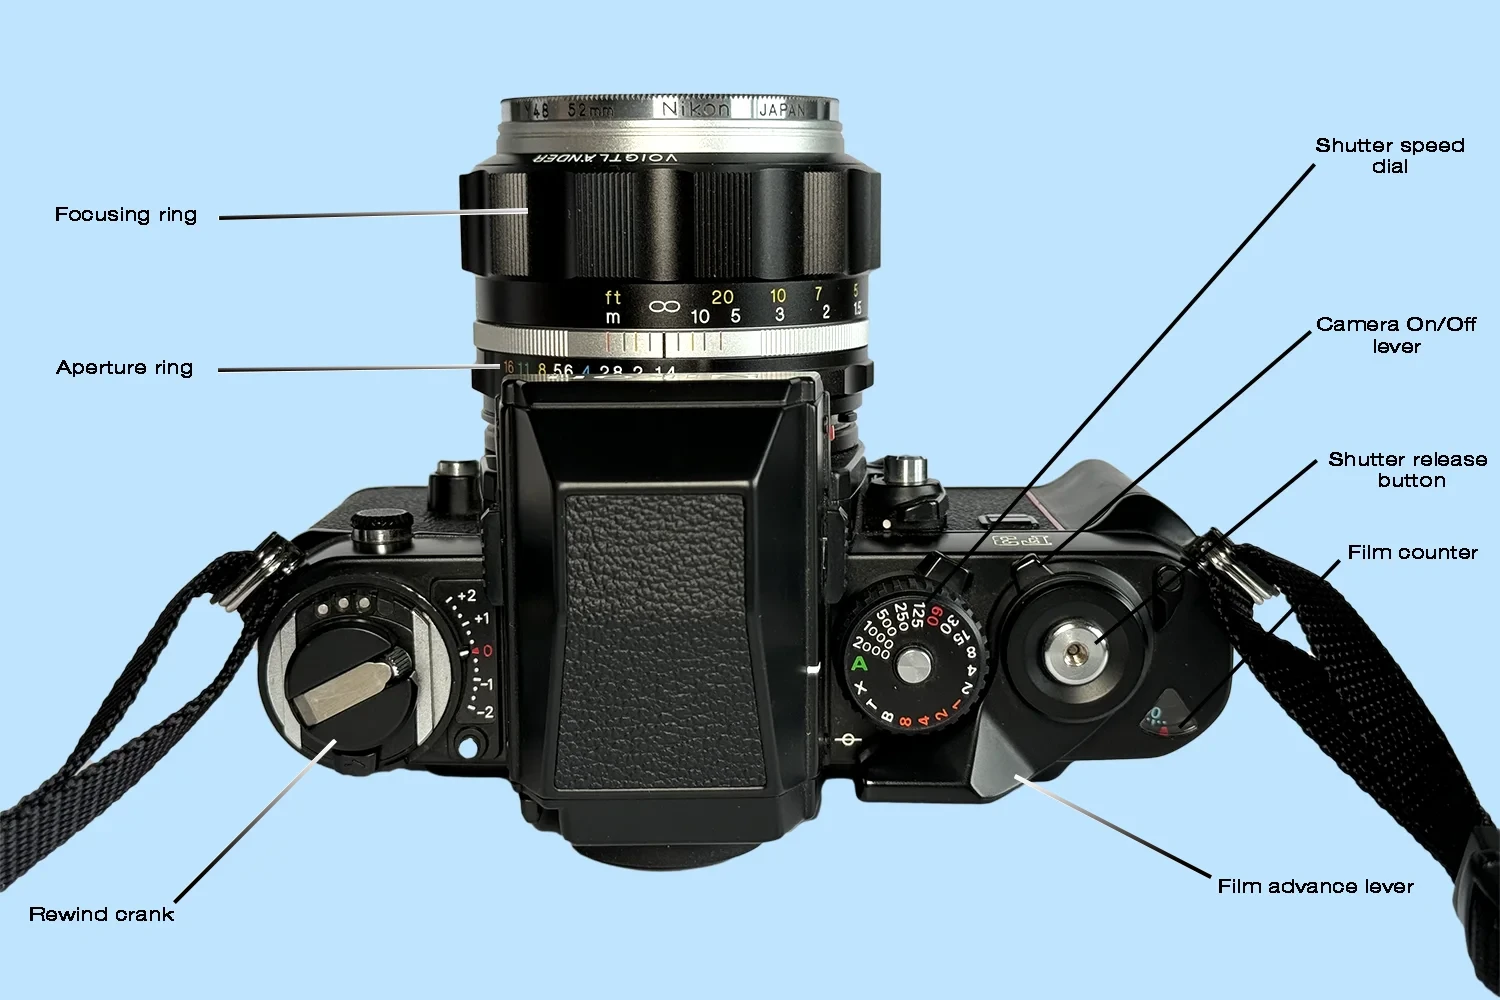
4) Focus
Most film cameras have manual or automatic focus.
-
Manual focus → you turn the focus ring on the lens until your subject is sharp.
-
Autofocus (AF) → the camera adjusts focus automatically.
Tip: For portraits, focus on the eyes. For landscapes, use infinity focus or a small aperture.
Basic Film Camera Controls Cheat Sheet for Beginners
5) Light Meter / Exposure Indicator
Many film cameras have a built-in light meter that tells you if your photo will be too dark, too bright, or correctly exposed.
-
Needle in the middle or green light → correct exposure.
-
Needle left / red light → underexposed (too dark).
-
Needle right / red light → overexposed (too bright).
Tip: Adjust shutter speed or aperture to match the light meter for perfect exposure.
6) Film Advance & Rewind
-
Advance lever / knob → moves the film to the next frame after each shot.
-
Rewind knob → rewinds film back into the cartridge when finished.
Tip: Always rewind film fully before opening the camera to avoid ruining your photos.
7) Flash
Some film cameras have built-in or attachable flash units.
-
Auto flash → fires when the camera detects low light.
-
Manual flash → you decide when to use it.
Tip: Use flash sparingly for natural light effects. Too close, and subjects may look washed out.
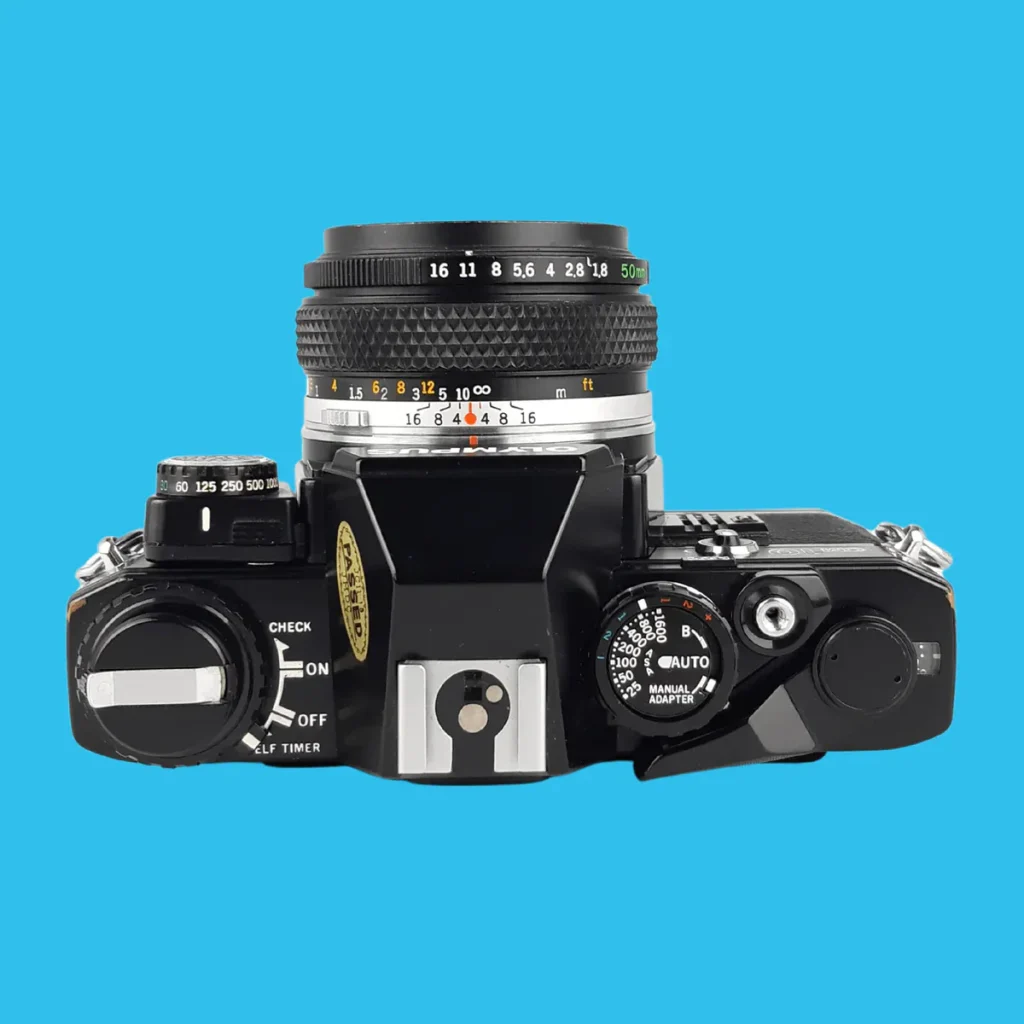
8) Camera Modes
Even film cameras often have basic modes or settings:
-
P (Program) → camera chooses shutter speed and aperture.
-
A / Av (Aperture priority) → you set aperture, camera chooses shutter speed.
-
S / Tv (Shutter priority) → you set shutter speed, camera chooses aperture.
-
M (Manual) → you control both shutter and aperture.
Tip: Beginners can start with Program mode, then experiment with Aperture or Shutter priority for more creative shots.
9) Composition Basics
Even with perfect settings, a photo can feel dull if it’s not composed well.
-
Rule of thirds: Place the subject along imaginary grid lines for balance.
-
Leading lines: Use roads, rivers, or fences to guide the eye.
-
Framing: Use natural frames like windows or branches to highlight your subject.
-
Perspective: Change your angle—get low, high, or closer for interest.
Tip: Always check the edges of your frame; film cameras don’t let you crop after shooting.
10) Common Mistakes Beginners Make
-
Using wrong ISO for lighting → photos too dark or too grainy.
-
Forgetting to advance the film → double exposures or missed shots.
-
Shooting with aperture too wide for landscapes → blurry background.
-
Not checking focus → blurry subject.
-
Not rewinding film → ruined roll when opening camera.
Tip: Take notes or mark settings for each roll until you remember them.
Basic Film Camera Controls Cheat Sheet for Beginners
Quick Reference Table
| Control | Function | Beginner Tip |
|---|---|---|
| Shutter Speed | How long film is exposed | Fast = freeze motion, Slow = motion blur |
| Aperture | Lens opening size | Low f = blurry background, High f = more focus |
| ISO | Film sensitivity | Low ISO for bright light, High ISO for low light |
| Focus | Sharpness of subject | Manual = adjust ring, AF = camera does it |
| Light Meter | Measures exposure | Adjust shutter/aperture to match meter |
| Film Advance/Rewind | Move film | Always rewind before opening camera |
| Flash | Adds light | Use sparingly to avoid overexposure |
| Camera Modes | How exposure is set | Start with Program, try Manual later |
Final Advice
Film photography is about patience and practice. Unlike digital cameras, you won’t see results instantly, but that’s part of the fun.
-
Start with easy, daylight shots.
-
Experiment with different ISO films.
-
Learn to read your light meter.
-
Keep notes of your settings and results.
With time, you’ll understand your camera intuitively and start capturing beautiful, timeless images.
Read Also: Keep your face towards the sunshine and shadows will fall behind you
Watch Also: https://www.youtube.com/@TravelsofTheWorld24


Leave a Reply