Have you ever wondered what lies beneath your feet? Earth is like a giant layered cake, and scientists call these layers the crust, mantle, and core. Learning about Earth’s layers can be fun, especially when you see them in action through science projects.
In this article, we’ll explore Earth’s layers, why they’re important, and give you hands-on science projects that you can do at home or in class. These projects are perfect for kids, students, and anyone curious about how our planet works.
Understanding the Layers of Earth
Before starting science projects, it’s important to know about Earth’s three main layers:
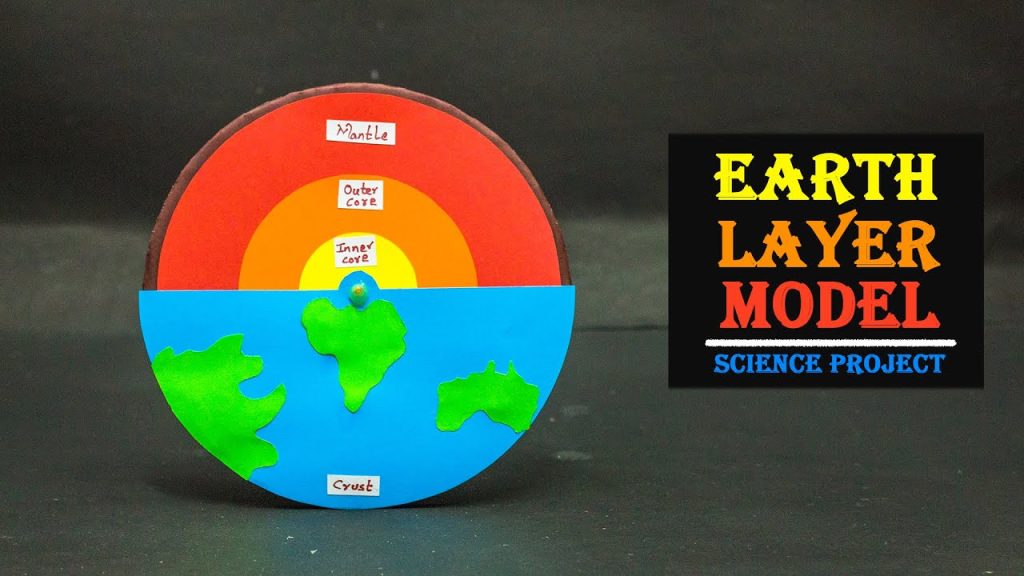
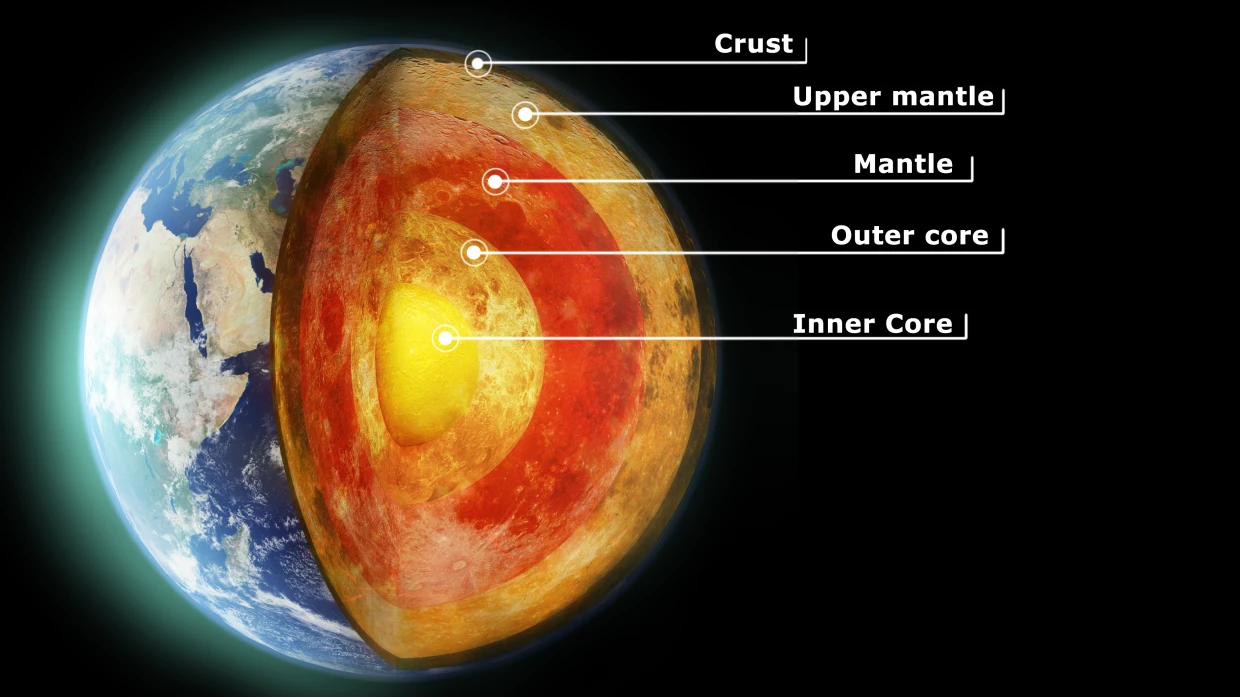
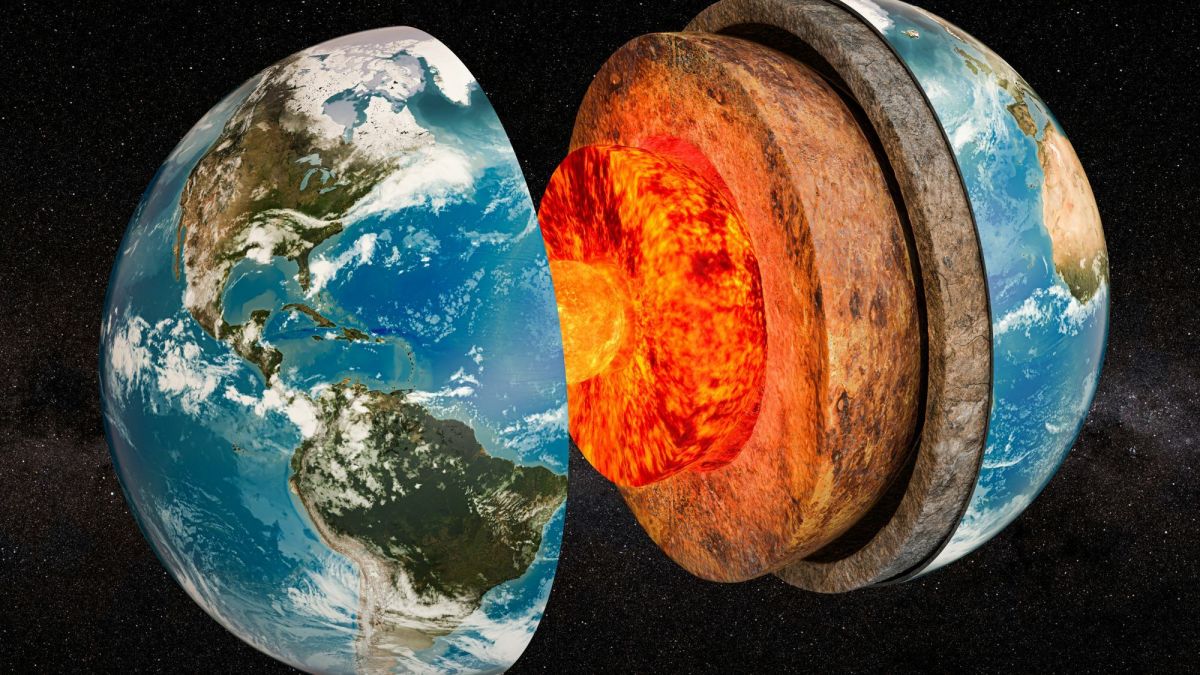
1. The Crust – The Outer Layer
-
The crust is the thin, outer layer where we live.
-
It includes land, mountains, oceans, and soil.
-
Thickness: 5–70 km, depending on location.
2. The Mantle – The Middle Layer
-
The mantle lies beneath the crust and is made of hot, semi-solid rock.
-
It extends to about 2,900 km below the surface.
-
Mantle movement creates tectonic plate motion, earthquakes, and volcanic activity.
3. The Core – The Center of Earth
-
The core has two parts:
-
Outer core – liquid iron and nickel, generates Earth’s magnetic field
-
Inner core – solid iron and nickel due to extreme pressure
-
-
Temperature: up to 7,000°C
Why Earth Layer Science Projects Are Important
Science projects about Earth’s layers help students:
-
Visualize abstract concepts like the mantle and core
-
Understand tectonic activity, earthquakes, and volcanoes
-
Learn the difference between solid and liquid layers
-
Develop critical thinking and creativity
-
Prepare for school science fairs or projects
Hands-on projects make learning memorable, interactive, and fun.
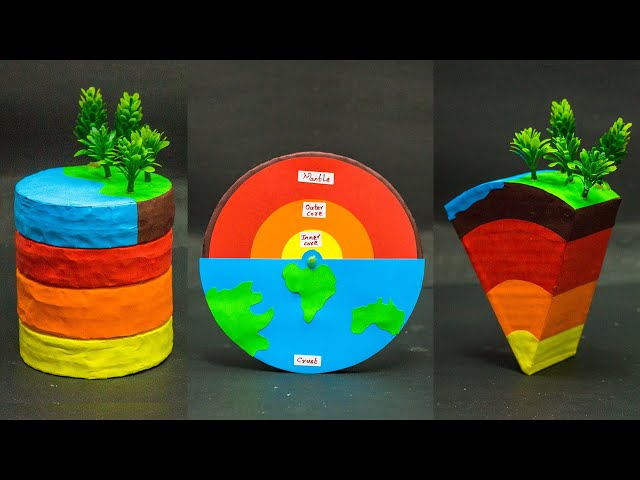
Project 1: Layered Earth Model with Clay
Materials Needed:
-
Different colors of modeling clay
-
Rolling pin or hands
-
Knife or plastic spatula
Steps:
-
Roll out layers of clay:
-
Brown for crust
-
Orange/red for mantle
-
Yellow for outer core
-
Red/white for inner core
-
-
Stack layers on top of each other to form a sphere or cylinder.
-
Slice through the model to see all layers clearly.
Learning Outcome:
-
Understand the relative thickness of each layer.
-
Visualize how layers are stacked inside Earth.
Project 2: Edible Earth Layers (Candy Science)
Materials Needed:
-
Graham crackers or cookies (crust)
-
Chocolate or peanut butter (mantle)
-
Marshmallows (outer core)
-
Gummy candy (inner core)
Steps:
-
Layer the ingredients to represent crust, mantle, outer core, and inner core.
-
Use a knife to slice and show layers.
-
Discuss what each layer represents and eat it after the demonstration!
Learning Outcome:
-
Makes learning about Earth’s layers delicious.
-
Helps students remember layers easily.
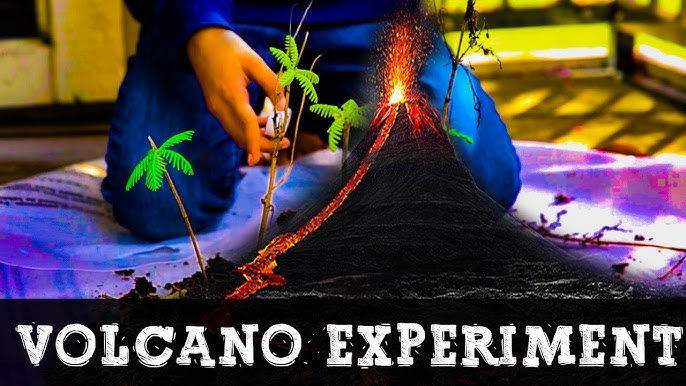
Project 3: Volcano Eruption to Explore Mantle
Materials Needed:
-
Baking soda
-
Vinegar
-
Food coloring
-
Small plastic bottle
-
Tray
Steps:
-
Place the bottle on the tray.
-
Add baking soda and a few drops of food coloring.
-
Pour vinegar to simulate magma eruption from the mantle.
Learning Outcome:
-
Demonstrates how mantle rock melts into magma.
-
Explains volcanic eruptions in a safe, visual way.
Project 4: Magnetic Core Demonstration
Materials Needed:
-
Iron filings or small metal objects
-
Strong magnet
-
Clear container or box
Steps:
-
Place the iron filings in a container.
-
Move the magnet underneath to simulate Earth’s outer core generating a magnetic field.
-
Observe how filings align and create patterns.
Learning Outcome:
-
Helps students visualize the magnetic field generated by the outer core.
-
Shows how Earth’s magnetic shield works.
Project 5: DIY Tectonic Plate Movement
Materials Needed:
-
Foam sheets or cardboard
-
Sand or flour
-
Water tray
-
Marker
Steps:
-
Draw tectonic plates on foam sheets.
-
Place them in a tray with a thin layer of sand or flour.
-
Push plates slowly to simulate plate collisions, subduction, and spreading.
Learning Outcome:
-
Demonstrates earthquake zones and mountain formation.
-
Shows how plates move above the mantle.
Project 6: Earth Layers in a Jar
Materials Needed:
-
Clear jar
-
Honey, syrup, oil, water, sand, small beads
Steps:
-
Layer each liquid or solid to represent density differences in Earth layers.
-
Discuss why heavier layers are closer to the core and lighter layers are near the crust.
Learning Outcome:
-
Shows density and layering in a simple, visible way.
-
Explains why the core is heavy and dense.
Project 7: Earthquake Shake Table
Materials Needed:
-
Wooden board
-
Rubber bands
-
Small building blocks or LEGO
Steps:
-
Create a simple shake table using a wooden board and rubber bands.
-
Build small structures on top.
-
Simulate earthquakes by shaking the board.
-
Observe which structures fall and why.
Learning Outcome:
-
Shows effects of tectonic movement on buildings.
-
Helps students understand why earthquake-resistant designs are important.
Project 8: Simulating Mantle Convection
Materials Needed:
-
Clear container
-
Water
-
Food coloring
-
Heat source (lamp or hot plate)
Steps:
-
Fill the container with water and add a few drops of food coloring.
-
Heat one side of the container slowly.
-
Watch colored water rise and fall, simulating convection currents in the mantle.
Learning Outcome:
-
Demonstrates how heat moves through the mantle, driving plate movement.
-
Explains why Earth’s interior is dynamic.
Project 9: Core Temperature and Pressure Experiment
Materials Needed:
-
Balloons
-
Hot water
-
Small weights or objects
Steps:
-
Inflate a balloon (representing Earth’s outer layer).
-
Apply hot water to simulate core heat.
-
Add small weights to show pressure effects in the inner core.
Learning Outcome:
-
Helps students visualize pressure and heat effects inside Earth.
-
Explains why the inner core is solid despite high temperatures.
Project 10: Digital Earth Layer Simulations
Materials Needed:
-
Computer or tablet
-
Internet connection
-
Earth layer simulation apps or websites
Steps:
-
Explore interactive Earth simulations online.
-
Rotate Earth to see crust, mantle, and core.
-
Observe earthquakes, volcanoes, and plate movement in real time.
Learning Outcome:
-
Combines technology and science.
-
Provides realistic visuals for understanding Earth’s layers.
Tips for Doing Science Projects
-
Always follow safety rules, especially with heat or chemicals.
-
Label layers clearly for presentations.
-
Use different colors to make layers easy to identify.
-
Document observations with photos, drawings, or videos.
-
Explain what each layer does and why it matters.
Why Learning About Earth Layers Matters
Understanding Earth’s layers is not just fun—it’s important for real life:
-
Earthquake preparedness: Knowing plate movement helps engineers design safe buildings.
-
Volcano safety: Learning about magma and mantle activity helps communities stay safe.
-
Magnetic field protection: The core generates the magnetic field that protects life from harmful solar radiation.
-
Resource discovery: Minerals, oil, and natural gas are often found based on knowledge of Earth’s layers.
-
Space exploration: Learning about Earth helps us understand other planets.
Fun Facts About Earth’s Layers
-
The crust is like the skin of an apple compared to the whole planet.
-
The mantle is so thick it could hold 20 Earths stacked inside it!
-
The inner core is hotter than the surface of the Sun.
-
Earth’s magnetic field is generated by flowing liquid metal in the outer core.
-
Tectonic plates move about as fast as your fingernails grow.
Conclusion
Earth is an amazing planet with layers that protect, shape, and support life. Science projects about Earth’s layers help students visualize these invisible processes, making learning exciting and memorable.
By doing hands-on projects, kids and students can:
-
Understand Earth’s structure
-
See plate tectonics and volcanic activity
-
Learn about density, heat, and magnetic fields
-
Have fun while learning important science concepts
Whether you use clay, candy, jars, or digital simulations, Earth layer projects make science come alive. The next time you look at the ground, remember that beneath your feet is a layered world full of heat, movement, and mystery—waiting to be explored!
Read Also: Keep your face towards the sunshine and shadows will fall behind you
Watch Also: https://www.youtube.com/@TravelsofTheWorld24


Leave a Reply